One of Adobe Photoshop’s many talents at your disposal is the ability to create and decorate fonts. This tutorial is for beginners, and the instructions are applicable for Photoshop Creative Suite 1 through 6.
Character attributes
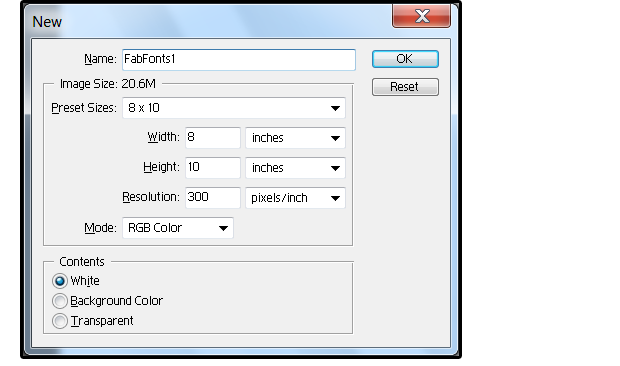
1. Open Photoshop and select File > New > Name. For this example, we’ll call it FabFonts1 and make these further choices:
- Preset: Custom
- Width: 8 (inches)
- Height: 10 (inches)
- Resolution: 300 (pixels/inch)
- Color Mode: RGB
- (Background) Contents: White
- Then click OK.
Three important tips:
- Use 300 (pixels/inch) for printed materials and 72 (pixels/inch) for Internet/website images. Be aware; however, that once you create your image at 72 ppi (pixels per inch), you cannot enlarge it to 300 ppi (called Resample) successfully. The enhanced image will suffer from something called compression noise—fuzzy, bloated, distorted pixels that create blurry halos around all the objects in the image. Create your “new” Photoshop files at 300 ppi, then scale down if necessary—reduction in pixels or size does NOT distort the image like upgrading or enlarging.
- Pay attention to your color mode. RGB means Red, Green, Blue. Select this Color Mode for screen, Internet, and photographs. CMYK means Cyan, Magenta, Yellow, and Black. Use this Color Mode for images or text that’s printed on your local printer, at a professional printing company or publisher. CMYK files are almost double in size to RGB files, so always work in RGB, then convert later, if necessary.
- If you forget to convert your RGB file to CMYK before you print it, don’t worry, the “new” printers automatically convert it for you. If, however, you upload a CMYK file to a website on the Internet, the image does not display, because the Internet does not support CMYK images.

JD Sartain / PC World
2. Select the Text/Type tool [T] and enter: Fabulous Fonts.
[Source”pcworld”]
